on
TISC 2023 Levels 1 and 2
TISC 2023 was a 2-week long, annual CTF organised by TISC from 22 September 2023 - 1 October 2023. I participated in it, and managed to solve levels 1 and 2, achieving a placing of 131st out of 1406 participants.
Level 1: Disk Archaeology

The first level provides us with a compressed file, along with its MD5 hash. We are asked to look into the disk image to find the flag. You can download the .tar.xz file here.
On calculating the MD5 hash of challenge.tar.xz, we realise that it does not match the provided MD5, which indicates that certain files may have been modified or removed. After unzipping the file, we find a .img disk image. A bit of searching online reveals that Autopsy is a tool which can open disk images, recover deleted files and see file history. Note that Autopsy only supports windows, linux and OS X.
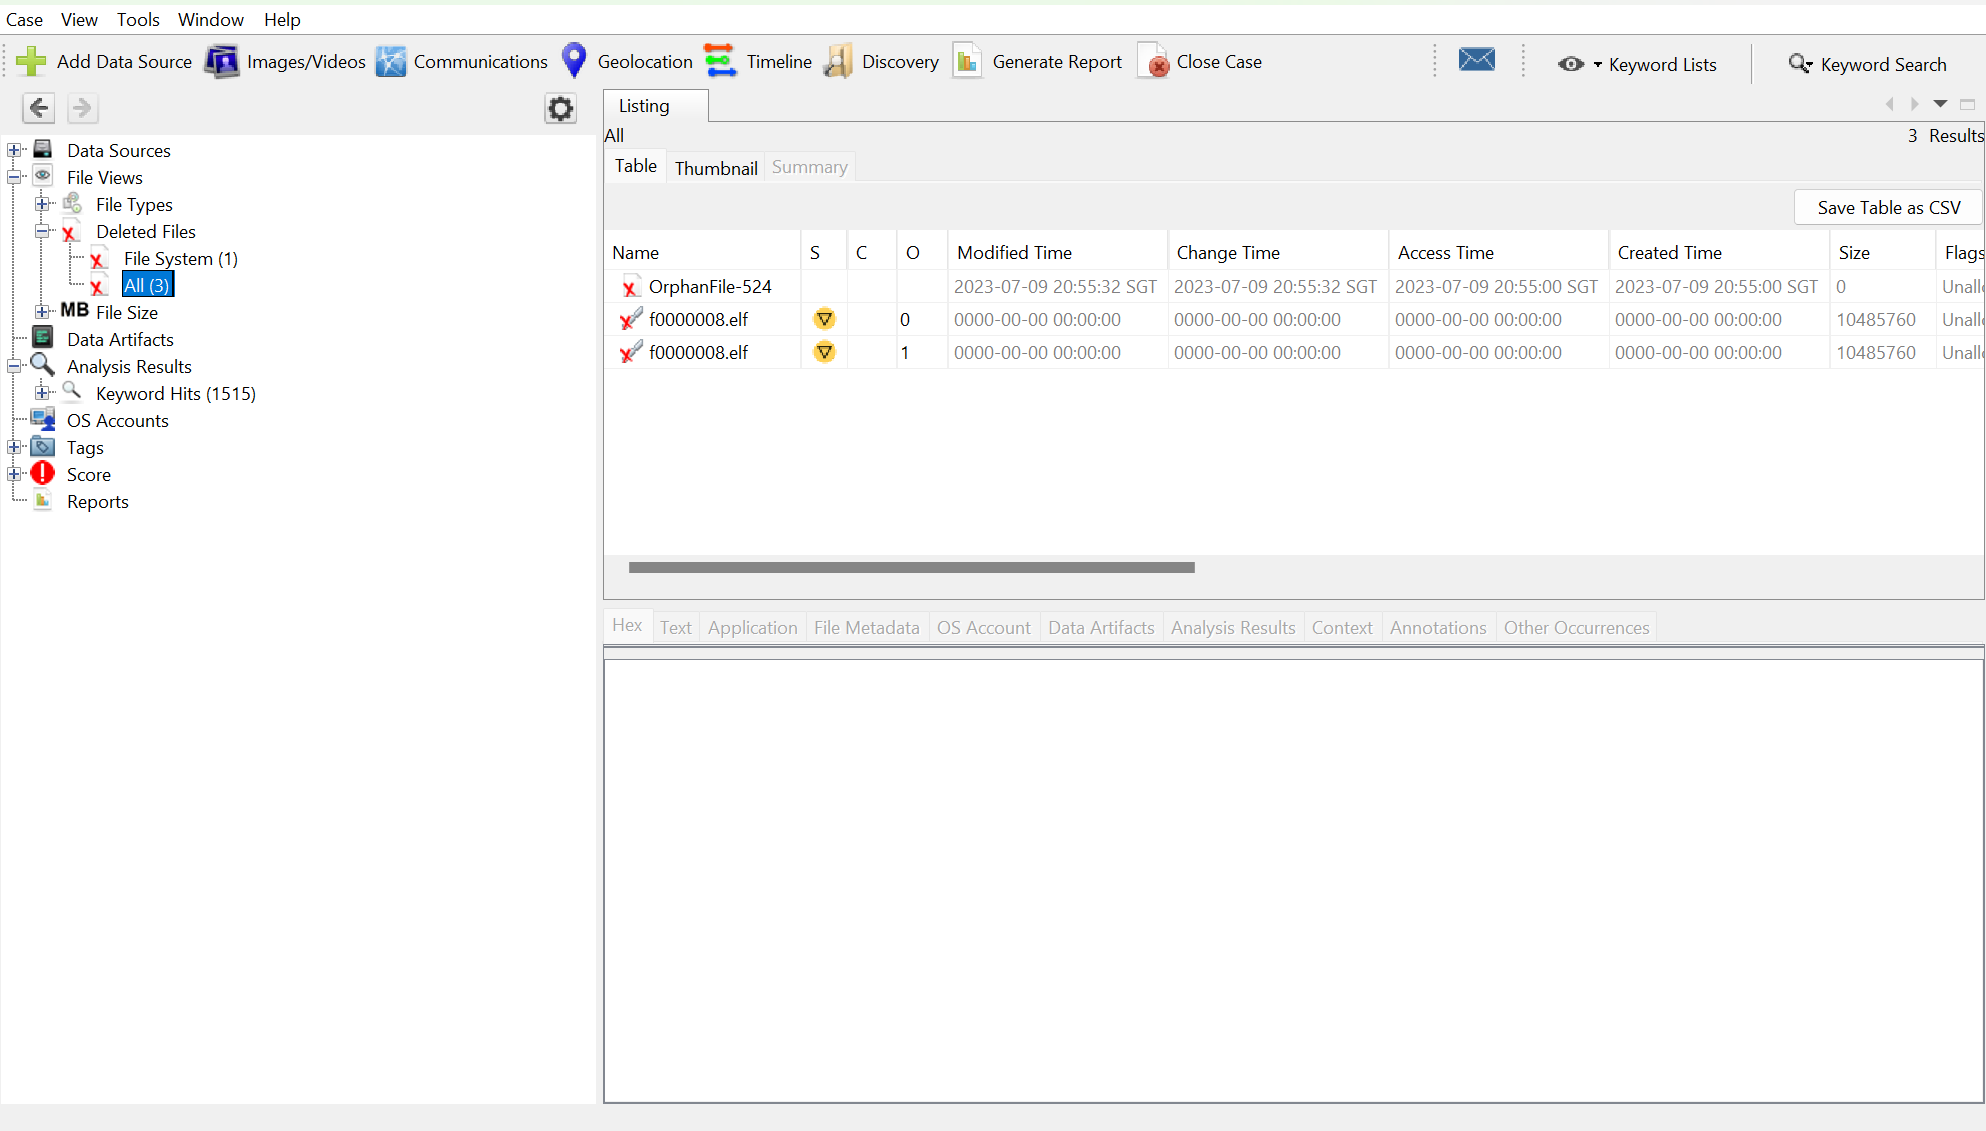
Opening the disk image using Autopsy shows that there are two deleted files, one of which is an ELF file:
Further research shows that ELF files are a type of executable files used in linux systems. I then extracted the deleted ELF file, and ran the file command on it:

Thus in order to run the executable, we need the /lib/ld-musl-x86_64.so.1 interpreter. Apparently, this interpreter is included in Alpine linux. I then ran the file on Alpine Linux using WSL and obtained the flag:

Level 2: XIPHEREHPIX’s Reckless Mistake

The challenge provides us with a C source code file, as well as its compiled binary. You can download the source code here and the binary file here.
The main function is as given below:

The program first prompts the user for a password. The verify_password function takes the password, encrypts it using SHA256, then compares it to a hard-coded hashcode to check if the password is correct. The function returns false if they match, and true otherwise.
The initialise_key function does several things. It first calculates the SHA256 of a hard-coded seed, then stores its value in arr. Secondly, it further encrypts arr several more times using SHA256. Thirdly, it uses an algorithm to perform XOR operations on key, modifying the values in key depending on each char in password. The initialise_key and accumulate_xor functions are given below.
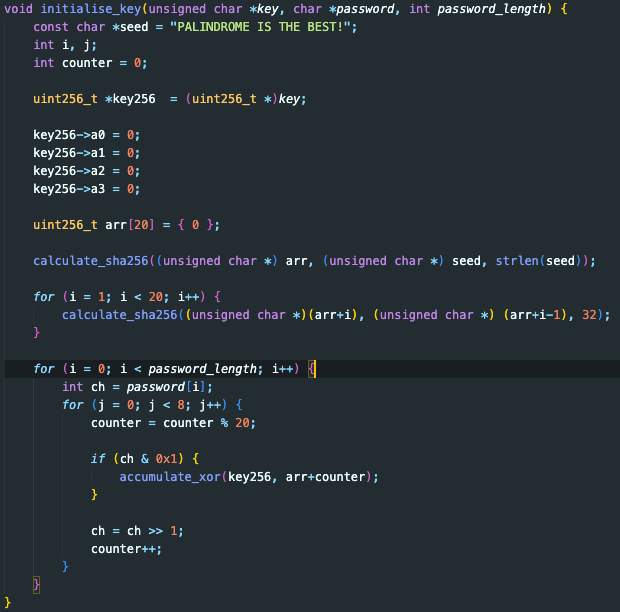
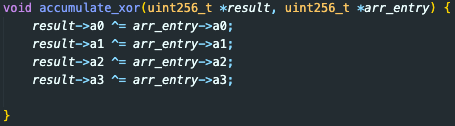
(note: uint256_t is a struct made from four uint64_t, named a0, a1, a2 and a3.)
If we pass the correct key to the show_welcome_msg function, we will be given our flag.
The key to solving this challenge lies in closely examining the way the XOR operation is performed in initialise_key. First, note that since seed is hard-coded and we have the source code, we can derive the encrypted arr ourselves if we just used the same loop. Secondly, the algorithm is essentially looking at every bit of password, and accordingly performing XOR operations on key using arr.
Note: when you XOR another value twice, it is akin to not performing an XOR operation at all.
We realise that regardless of how long password is or what constitutes password, we have at most \(2^{20}\) ways to modify key. This is because there are only 20 uint256_t elements in arr, and we either XOR key with each element in arr an even number of times (causing no effective XOR with that element), or an odd number of times (same as just performing XOR once).
Knowing this, we simply need to rewrite some code to perform a brute force attack and try all \(2^{20}\) combinations, and only output the welcome message which gives us the flag.
The main bruteforce code I used is shown below (I embedded this code into the initialise_key function). I basically used a long long to simulate the XOR of key with each element of arr.
long long a = 0l;
while (a <= pow(2, 20)) {
    long long b = a;
    int ind = 19;
    while (b != 0) {
        if (b & 0x1) {
            accumulate_xor(key256, arr + ind);
        }
        b = b >> 1;
        ind--;
    }
    a++;
    show_welcome_msg(key);
    // reset key
    key256->a0 = 0;
    key256->a1 = 0;
    key256->a2 = 0;
    key256->a3 = 0;
}
I also added the following code to show_welcome_msg:
if (strncmp((const char *)plaintext, "TISC", 4) == 0) {
  printf("Welcome PALINDROME member. Your secret message is %.*s\n", plaintext_length, plaintext);
}
You can see my full solve script here. As I wasn’t sure what version of openssl to use, I opened the binary file in a text editor and found it was using 3.0.0. I downloaded openssl 3.0 using homebrew, then compiled the file as such:
gcc -o solution solution.c -I/opt/homebrew/opt/openssl@3.0/include -L/opt/homebrew/opt/openssl@3.0/lib -lssl -lcrypto
Running the file then gives the flag as such:

Those were the two levels I completed from TISC 2023. In the process of solving level 1, I learnt about disk imaging and the features of Autopsy. Level 2 also trained my ability to spot security vulnerabilities in code, and my creativity in making code to exploit those vulnerabilities.